Move a Marketplace Azure Virtual Machine to another subscription
I came across a requirement to move my WordPress hosted Virtual Machine created using Azure Market Place bitnami plan to a different subscription.
The Move Resource Group Resources to another subscription found failed with the following error
Resource move is not supported for resources that have plan with different subscriptions.
With the below given steps, I was able to move the virtual machine and the WordPress website to my new subscription successfully! Hope, the steps will help you also!
- Get the Azure Market Place plan and other details of the Virtual Machine
- Retain the OS disk only and Delete the Virtual machine and rest of the associated resources from the subscription
- Move the Virtual Disk to your required subscription
- Accept the Marketplace terms for your plan of the WordPress in the new subscription
- Create the new Virtual Machine with the old disk and the same Azure Market Place plan
- Adjust the Azure NSG rules so that you can be able to access the WordPress website, SSH access to the virtual machine
- Change your resource’s DNS settings with new Public IP
- Thant’s it!
Get the Azure Market Place plan details and other necessary info of the Virtual Machine
The following CLI command will show the details needed while creating the new VM
az vm show --resource-group demoRG --name myVm1 --query plan
Also, check the following details from Azure Portal
Size of the VM (Ex: Standard_B1ls), OS Type (for WordPress site it is ‘linux’)
Make sure that, the Azure Market Place plan in which the resources were created is still existing with the following CLI command. If it’s not valid, you mayn’t be able to create the Virtual Machine successfully with the same plan
az vm image list-skus --publisher Fabrikam --offer LinuxServer --location centralus
Delete the Virtual Machine and other resources except the OS disk and Move the Virtual Disk to your new subscription
Move the disk to the required subscription with Azure Resource Move and Get the Disk details from the properties of the Disk after. Example value is as given below:
/subscriptions/<subname>/resourceGroups/exchangeonline/providers/Microsoft.Compute/disks/exchangeonline_OsDisk_1_51ed0014xxxxxxxxxx677142xxxd
Accept the Marketplace terms for your plan in the new subscription using the CLI command as below:
az vm image terms accept --publisher {publisher} --offer {product/offer} --plan {name/SKU}
Create the new Virtual Machine with the old disk and the same Azure Market Place plan with the following CLI command
az vm create --resource-group exchangeonline --name exchangeonline --plan-name "4-4" --plan-product wordpress --plan-publisher bitnami --attach-os-disk "/subscriptions/<subname>/resourceGroups/exchangeonline/providers/Microsoft.Compute/disks/exchangeonline_OsDisk_1_51ed0014xxxxxxxxxx677142xxxd" --os-type linux --location eastus2 --size "Standard_B1ls"
If the above command has executed successfully, you will get a similar output indicated that Virtual Machine has created successfully, as below:

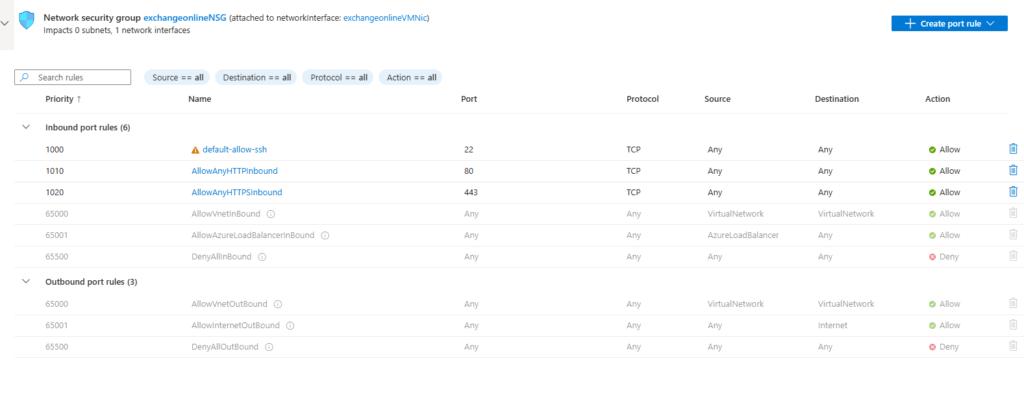
Adjust the Azure NSG rules so that you can be able to access the WordPress website, SSH access to the virtual machine
For my WordPress website, I have opened the Ports 22, 80 and 443 as below:

Change your DNS settings with new Public IP
As the Virtual machine has created newly, Azure might attach a different Public IP address, and this change has to be updated in your DNS settings of the hosting provider like GoDaddy
With the above steps, the resources should be up and running in the new Subscription!